Showing posts with label Fruit. Show all posts

Monday, August 8

The Art of Eating an Orange!

I'm not sure there really is an Art to Eating an Orange, but it's the way I grew up eating one.  I honestly believe it's the best way to savor each and every drop of juice that pours into your mouth, feel the threads of the carpels as you sink your teeth into the meat of the orange while juice oozes from the vesicles, all while you delicately grasp this round, somewhat uneven textured, piece of fruit.

When I was a little girl each and everyday I came home from school my snack of choice was an orange and a pickle.  I know, it sounds weird but I loved having the sweet with the sour, I suppose.  What else could it be?

The way I ate the orange then and now are different however, not by choice.  One day my husband walked into the house just as I was eating my orange the way I like it.  He looked at me and said, "What on earth are you doing?"  I said, "eating an orange."  He said it was so disgusting the way I ate it, that I quit eating it that way, unless of course no one is at home.

I mean, I don't want to look disgusting while eating it but then again, why not enjoy it the way I like to, at least in the privacy of my own home!  So when no one is at home, I'll eat it that way, otherwise I conform when in public.

I know I've peaked your curiosity with the way I savor this orange, baseball looking piece of fruit, so I'll share my eating method but, don't hold it against me.  In fact, do me a favor - try an orange this way.  PLEASE, report back, with your own critique! 

The Art of Eating an Orange

First, wash the skin of the orange to get off any pesticides.  Of course, when I was a child we didn't know about these things, so I never washed it unless it was covered with dirt.

Slice the orange in half, perpendicular to the stem.
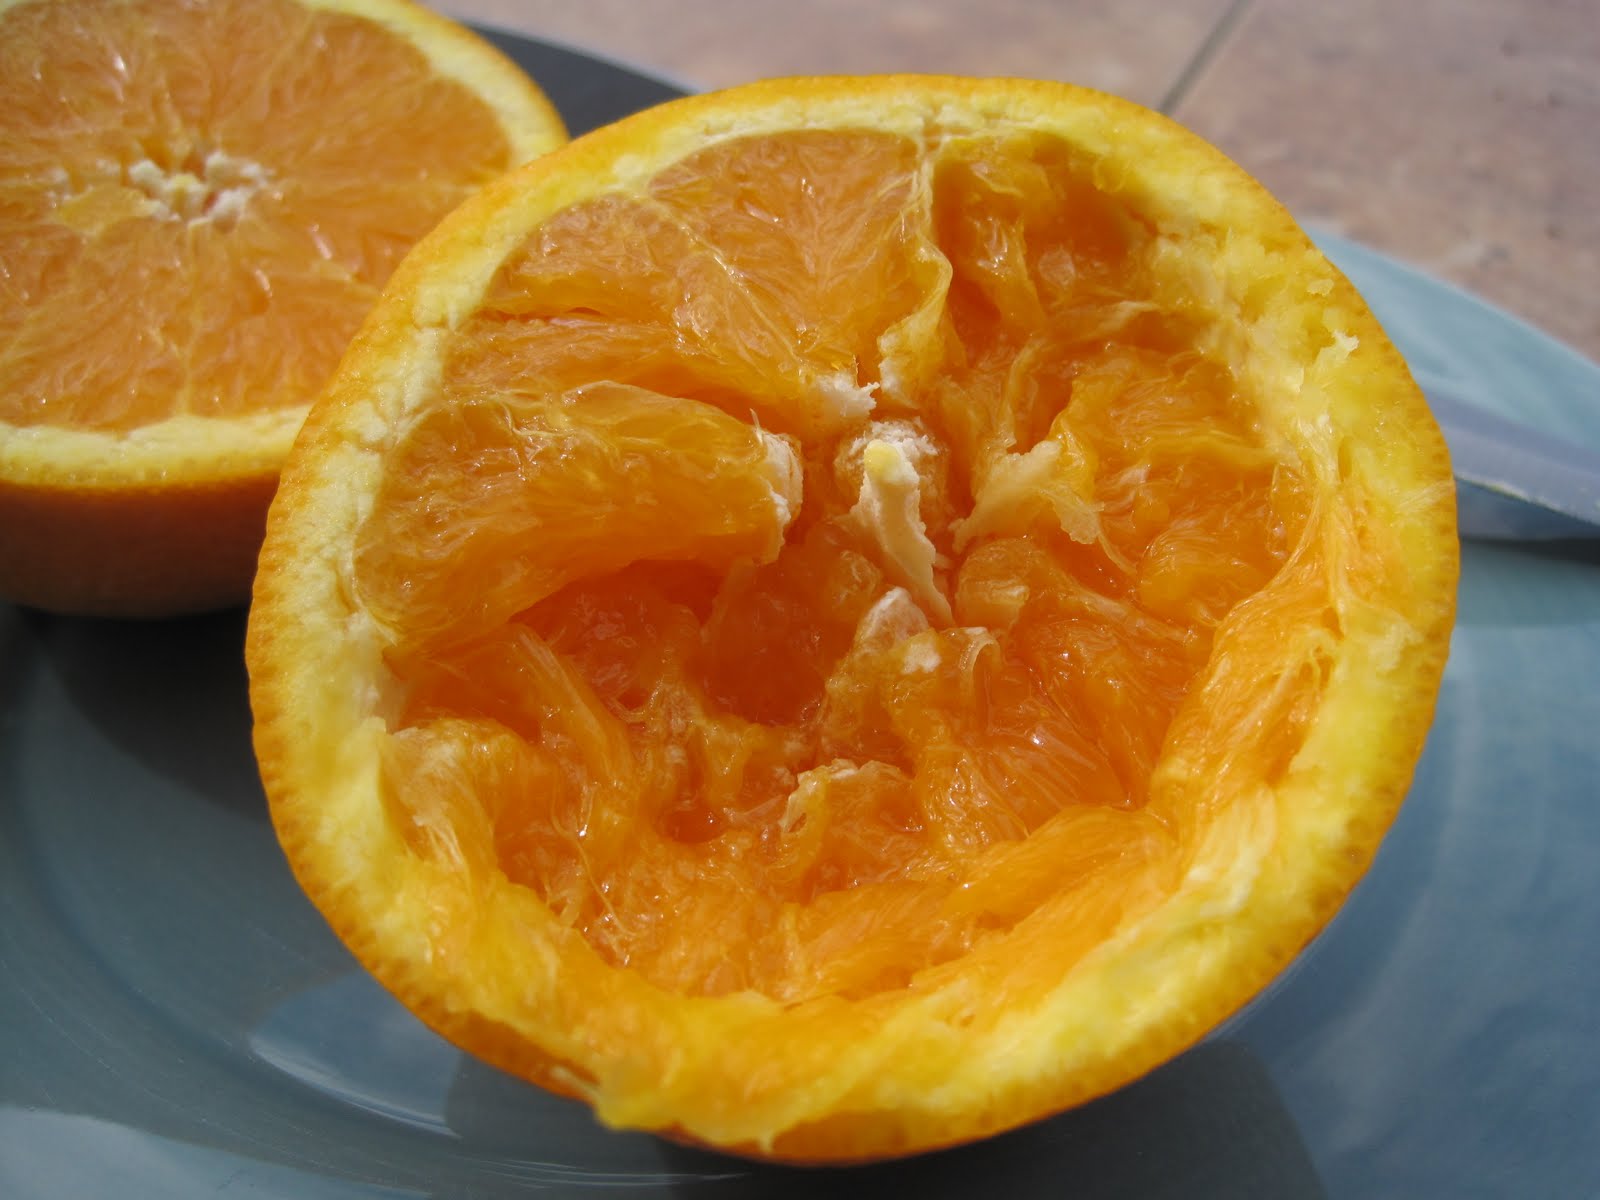
Then, holding one half in your hand, place an edge of the cut side into your mouth and with your upper teeth proceed to scrape the meat of the orange into your mouth.

Once you have gone all the way around the orange doing this, you then squeeze the remaining orange juice into your mouth!

That's not it, there's still more?  Now turn the orange inside out, so the remaining meat is arched outward.

With your teeth, peel off the remaining meat and tissue.  Eat and enjoy!

When I was growing up I would toss the skin away.  However, now I use the zest of an orange in a variety of recipes.  If this is something you like to do as well, I'd suggest zesting the orange before devouring the insides.

How awful is this eating method?  Honestly I wasn't raised in a barn but for some reason this is how I ate them.  No one taught me, it just happened to be the way I found the most satisfaction from my oranges.

How do you eat an orange?  Do you peel the skin away, sectioning out each segment, then placing each half moon in your mouth?  Do you eat it like I've described above or do you have your own special way? 

If you've never tried eating an orange the artsy way, like I love to, then please do, and report back to me, right here. I'd enjoy hearing what you think.

Do you have a favorite way of eating fruit that you would never reveal in front of others?  If so, please share it with us.  We won't judge you, after all we all have something odd that we do, right?

Words of Caution if eating an orange this way!  Watch out for spurts of juice in your eye and don't forget the floss, your teeth will need it when your done.  But hey, it's all worth it.  It's the most fun you'll ever have eating an orange. At least I think so!


Tuesday, July 19

Strawberry Balsamic Jam and Peach Crostata!

There's nothing as simple as making a crostata.  This italian rustic freeform dessert is perfect anytime of the year.  If company is coming over and you want to prepare an effortless yet delicious dessert to serve with coffee this is ideal.

While visiting the blog Scrambled Henfruit last week I happened the come across a recipe for Strawberry Jam with a Twist.  Of course I was intrigued, and when I viewed the recipe found that the twist was Balsamic Vinegar a favorite ingredient of mine, and a recipe Scrambled Henfruit found on the blog Savory Sweet Life

The world wide web is wonderful for sharing and finding recipes and ideas.  One recipe leads to another and before you know it your meeting total strangers that have the same interests as you do.  I love it!

Anyway, when I saw this recipe I knew I wanted to make it.  I've actually never attempted to make jam before but I had all the ingredients at hand since it didn't use any pectin. The National Center for Home Food Preservation has guidelines for cooking without pectin that you might find helpful. 

Since my husband goes through jars of Strawberry Jam I figured why not try this and if he likes it, then I'd have more fun making batches of Strawberry Balsamic Jam for him than purchasing jar after jar of the ready-made varieties.

The recipe made a small amount so it wasn't necessary to "can" it, which thrills me.  Since that would take a whole other lesson that I wasn't in the mood to tackle. However, uncanned jam will keep in the refrigerator for up to 2 weeks.  Here's more information if you'd like to learn how to can jam.

Once I made the jam, I decided that I'd make a crostata using the Strawberry Balsamic Jam and the White Peaches that I had just purchased.  Together the two were a marriage made in heaven.  Warm out of the oven it was everything I had imagined and then some.  To say the least, it didn't last the day.

Strawberry Balsamic Jam and Peach Crostata
serves 6

Ingredients:

2 cups chopped strawberries
1 cup sugar
2 tablespoons balsamic vinegar
2 large peaches, cored and sliced into 1/4-inch slices


1 (9") premade Pillsbury pie crust
3 tablespoons sugar
water
1 tablespoons sugar

Directions:

Strawberry Balsamic Jam:


Combine strawberries, 1 cup of sugar and balsamic vinegar in a saucepan and bring to a boil.

Reduce heat and simmer uncovered for 20-30 minutes until sauce is a honey-like consistency or 220 degrees on a candy thermometer.  (For altitudes other than sea level see this chart for guidelines).

Remove from heat and cool.  If desired you can run through a blender to puree once completely cooled.

Crostata:


Slice fruit and place in a bowl with 3 tablespoons of sugar.  Mix together and set aside while preparing the dough.


Place parchment or foil on a countertop and roll out one 9-inch premade Pillsbury pie crust to approximately 12-inches. Place all on a pizza pan or sheet pan.


Spread approximately 3 tablespoons of the jam over the surface of the dough as if spreading sauce onto a pizza, leaving a 2-inch border all the way around.


Add the sliced peaches to the top of the jam and carefully pull up the sides of the dough over the edges of the fruit.  Leave an opening in the middle. Be careful not to tear the sides of the dough or fruit juices will ooze out during cooking.

With a pastry brush, spread water over the top of the dough and then sprinkle with 1 tablespoon of sugar.


Bake at 400 degrees for 50 minutes.

Remove from heat and allow to cool at least 10 minutes.  Place on serving platter and serve slices warm or at room temperature.

Note:  You can make any type of crostata using your favorite ingredients.  Simply follow these guidelines and you're sure to have a perfect tasting crostata everytime.

Enjoy!

Here's the recipe for a Peach and Blueberry Crostata that I posted in a previous blog.

(For those of you that have been following my blog for awhile, what type of recipe would you like to see me post or what topics would you like me to discuss?  Your feedback is important to me).

Monday, June 6

Frozen Fruit Salad & Push Pops

With the weather as hot as it's been I only crave fruits, veggies/salads and fish.  It's no wonder I feel 1000 times better when I eat just that.  My energy level is higher and I feel like I can go all day long. 

So this morning for breakfast I had my typical oatmeal with cinnamon and blueberries on it and for lunch I had a fresh spinach salad with berries, slivered almonds and poppyseed dressing.  I really felt like having some chicken on top but wasn't in the mood to go out in the heat and grill some up.  So the almonds were my protein.


I love fruit and one of my husbands favorite things that I've been making for years is a frozen fruit salad.  It's perfect on a hot summers day and although much of this is made with canned fruit, (which they say is still good for you) you don't have to opt for those with heavy syrup. (The photo above was taken straight from the freezer without any thawing time).


I made this recipe but also had some push pops that I purchased from CupKates Event Design and decided in addition to pouring my salad into a Rubbermaid container and freezing it I would also add some to my cute little push pops - the kids will LOVE these!

Here's my recipe.  It's delicious, refreshing and a little sweet so if you aren't a sweet lover cut back on the sugar.

Frozen Fruit Salad and Push Pops

Ingredients:

3 cups water
3/4 cup sugar
1 large can frozen orange juice
1 large can crushed pineapple
1 large can sliced peaches
1 large can fruit cocktail, drained
1 (10 oz.) package strawverries, frozen
6-8 bananas, sliced

Directions:
  • Boil water and sugar for 3 minutes 
  • Removed from heat and mix in 1 large can of frozen orange juice.
  • Add crushed pineapple, sliced peaches, fruit cocktail, strawverries, and bananas.  Mix well.
  • Pour all into a large container (I use a rectangular Rubbermaid container covered) and freeze for 24 hours.
  • Take out 1 hour before serving so it becomes just slightly slushy.
To make the push pops I simply reserved some of the mixture and poured it into the push pop containers and covered them with the lids they come with.  Then pop in the freezer for 24 hours, standing up in a glass or like I did - propped up between the slats of my freezer shelves.

The push pops make it easy to eat right from the freezer.  So if you're looking for a healthier dessert to give your children, there's no doubt they will love these.  Of course, we're all adults now in my family and we have fun eating the push pops too!  It reminds me of my childhood. 

Enjoy!

Tuesday, May 10

Fresh Spinach Salad with Poppy Seed Dressing!

This afternoon I threw together a fresh spinach salad for lunch.  I love spinach.  In fact, when I was a little girl I ate so much of it my family would often refer to me as Popeye.  I thought if I ate enough spinach I could be as strong as Popeye which would have been very cool.  Instead I remained a skinny little tomboy with lots of bruises from being so active. 

To this day, I often crave spinach, as I did this afternoon for lunch.  So I made this refreshing salad with fresh berries that I had leftover from Mother's Day. 


Fresh Spinach Salad with Poppy Seed Dressing
serves 6

Ingredients for Dressing:

1/4 cup rice vinegar (not rice wine vinegar)
2 tbsp. sugar
2 tsp poppy seeds
1/2 tsp. dry mustard
salt and pepper to taste
3/4 cup canola oil

Salad ingredients:

6 cups baby spinach leaves
2 cups strawberries, hulled and sliced
1/4 cup thinly sliced red onion
1 yellow bell pepper, thinly sliced
1/4 cup toasted almonds

Directions:

In a small bowl, whisk together the vinegar, sugar, poppy seeds, dry mustard, salt and pepper.  Whisk while slowly adding in the canola oil until the vinaigrette is well combined.

In a large bowl, toss together the spinach, strawberries, onion slices, peppers and almonds.  Add a portion of the vinaigrette and toss gently.  Taste and adjust by adding more vinaigrette if needed.  Serve immediately.

Enjoy this light and nutritious salad!

Don't forget to enter my OXO Mandoline Slicer Giveaway, for your chance to win this incredible kitchen tool!  Giveaway ends this Friday, May 13th.

Wednesday, September 22

Blintz Casserole with a Warm Blueberry Sauce


Have you ever had a blintz? They're like a crepe rolled up with cottage cheese inside that you then top with sour cream and cinnamon or fresh fruit sauce. They're best in my opinion served warm but good as well the next day right from the refrigerator.

This week my mom was having friends and family over for a light dinner so I decided to make this blintz casserole instead of the usual blintz's.

The process to make the casserole although simple took quite a few steps. The end result was more of a cake-like casserole rather than a crepe filled with wet, gooey cottage cheese but, delicious in it's own form.

My large casserole was gone by the end of the evening as well as the blueberry sauce which was heavenly. I knew when most everyone went back for seconds that it was a big hit!

Whether having a brunch, picnic or casual get-together this was well worth the effort.

Blintz Casserole
Serves 12

INGREDIENTS

Filling:

1-1/2 lbs. ricotta cheese
2 8-oz. pkgs. cream cheese, softened
2 eggs
1/4 cup sugar
3-1/2 Tablespoons lemon juice
1 teaspoon grated lemon peel
1 teaspoon grated orange peel
1/8 teaspoon salt

Batter:

1 cup all-purpose flour
1 Tablespoon baking powder
1/8 teaspoon salt
1 cup (2 sticks) butter, melted
1/2 cup sugar
3 eggs
1/4 cup milk
1 teaspoon vanilla extract

DIRECTIONS:

Preheat oven to 300 degrees F.

Beat together filling ingredients until well mixed. Set aside.

For the batter, combine flour, baking powder and salt. Set aside.

Beat together remaining batter ingredients. Blend in flour mixture.

In a 9'x13' pan, layer 1/2 the batter, all of the filling, remaining 1/2 of the batter.

Note: Be sure and divide the batter so that you really have 1/2 left to cover the top!

Bake at 300 degrees F for 1-1/2 hours.


Warm Blueberry Sauce

Serves 8-10

Ingredients:

2 (10-ounce) bags frozen blueberries
½ cup blueberry fruit juice, divided
1/4 cup sugar
2 tablespoons cornstarch

Directions:

1. Combine berries with ¼ cup juice in a medium saucepan; bring to a boil over medium heat. Stir in sugar.
2. Combine cornstarch and remaining juice; whisk until smooth.
3. Pour cornstarch mixture into boiling fruit mixture, stirring. The sauce will almost immediately thicken and grow clear.

Serve, hot or warm, over blintz casserole.

Vicki Bensinger on Foodista