Thursday, August 26

Southwestern Swordfish


Well my house is very quiet now. Both kids are gone and it's just my husband and I left with the 2 dogs. I guess you'd call us empty nesters now! On the one hand it makes me feel sad that they're all gone but on the other, it's a good thing. Afterall we raise them to eventually spread their wings and leave the nest.

My grocery bills are going to plummet which is the good news. However, I love fish and since I'll be doing all the cooking my husband is going to have to get use to eating more fish, something he's not too fond of on a regular basis. I figure at least 3 times a week should be good.

So last night I was thinking of making fish tacos something that I love. For some reason my husband can't stand the thought of them along with many others I know, so I decided I'd try something southwest but not in taco form.

I went to the fish market to get some Mahi-Mahi but apparently they haven't been able to get it. They don't know why but they along with the restaurants in town can't either. She said it had nothing to do with the oil spill though. So I went with Swordfish. It's nice and firm and thought it would work for what I wanted to put together.

Once home I gathered up my ingredients to make a marinade for the swordfish. Put my dressing ingredients together for the coleslaw, mixed it in and set aside to blend in the refrigerator. I then made my Pico de Gallo that was delightful and had a slight kick to it and set that aside as well for the flavors to meld.

I love sour cream and personally could eat it right from a spoon but try to refrain, so I picked up some nonfat plain yogurt and doctored it up a bit. It was tasty!

The finished product was wonderful. In fact, I plated it all out and it looked heavenly. Funny thing is, this all could be converted into a fish taco where my husband would have turned his nose up to it but, instead I plated it like a regular entree' and my husband loved it. He even went back for seconds until it was all gone. I'd say that's a good sign.

I worked on this dish to add to my list of culinary classes but with Labor Day coming up in just 1 1/2 weeks I thought I would share it in my newsletter that comes out once a month instead.

So if you'd like to get this fabulous tasting Southwestern fish recipe please sign up for my monthly newsletter at the top right of this page plus add yourself as a follower to my blog if you aren't already.

Each month I send out a newsletter with tips, recipes and everything food related to my culinary class clients and those foodies that have subscribed to it.

If you're a foodie lover then please sign up. If you live in Missouri please contact me for an in-home culinary class and a list of menus that I offer.

My newsletter will be out the first week in September, just before the holiday. For this entire recipe and other foodie news and tips please sign up.

Friday, August 20

Turmeric: The Spice, Health Benefits & Recipe


Oftentimes when I'm out running around and lunch time rolls around I'll stop in at Whole Foods, an incredible health foods market, to pick up some lunch. They have a vast variety of prepared foods to choose from that are so healthy and fresh. I love it.

One of my favorite side dishes that they have is an Israeli Couscous often labeled Cranberry Couscous but I have seen the same dish with other names. I usually get this along with some grilled salmon.

When I first ordered this dish I couldn't figure out what wonderful flavor I was tasting. It wasn't curry but had the same characteristics of curry with the bright golden color but a softer flavor. When I asked for the ingredient list I realized it was Turmeric. So when I came home I got on my computer to get all the facts on just "What is Tumeric?"

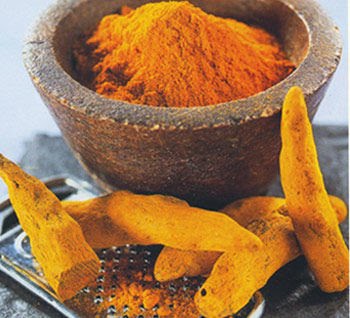
First of all Turmeric can be found in the spice section of the grocery store. It is a root, or rhizome, that looks like ginger on the outside with a bright orange flesh inside. The orange powder is ground from the rhizomes that are first boiled for hours and then dried for weeks. Dried turmeric has an earthy and slightly bitter taste.

Turmeric grows in the tropical forests of India, China, Southeast Asia, Jamaica, and Peru where it has been used for thousands of years. In Indian food, turmeric is an ingredient in curry, garam masala spice blends, and in chutneys. In Asian cooking, turmeric is used in soups, rice, salads, sauces, eggs, lentils, and fish recipes. Turmeric is also an ingredient in Worcestershire sauce, mustard and pickles.

Besides being a food, Turmeric is one of nature's most powerful healers. The active ingredient in turmeric is curcumin which has potent anti-inflammatory properties and has been known in Chinese and Ayurvedic Medicines for thousands of years. Recent research has revealed that turmeric is a natural wonder, proving beneficial in the treatment of many different health conditions from cancer to Alzheimer's disease

Here are 20 reasons to add turmeric to your diet:

1. It is a natural antiseptic and antibacterial agent, useful in disinfecting cuts and burns.

2. When combined with cauliflower, it has shown to prevent prostate cancer and stop the growth of existing prostate cancer.

3. Prevented breast cancer from spreading to the lungs in mice.

4. May prevent melanoma and cause existing melanoma cells to commit suicide.

5. Reduces the risk of childhood leukemia.

6. Is a natural liver detoxifier.

7. May prevent and slow the progression of Alzheimer's disease by removing amyloyd plaque buildup in the brain.

8. May prevent metastases from occurring in many different forms of cancer.

9. It is a potent natural anti-inflammatory that works as well as many anti-inflammatory drugs but without the side effects.

10. Has shown promise in slowing the progression of multiple sclerosis in mice.

11. Is a natural painkiller and cox-2 inhibitor.

12. May aid in fat metabolism and help in weight management.

13. Has long been used in Chinese medicine as a treatment for depression.

14. Because of its anti-inflammatory properties, it is a natural treatment for arthritis and rheumatoid arthritis.

15. Boosts the effects of chemo drug paclitaxel and reduces its side effects.

16. Promising studies are underway on the effects of turmeric on pancreatic cancer.

17. Studies are ongoing in the positive effects of turmeric on multiple myeloma.

18. Has been shown to stop the growth of new blood vessels in tumors.

19. Speeds up wound healing and assists in remodeling of damaged skin.

20. May help in the treatment of psoriasis and other inflammatory skin condition.

Afer rummaging through all the information on this incredible spice I decided I need to start adding it to my daily diet and find more recipes to include it in.

Turmeric comes in capsules, teas and liquid extracts, but Indian lore says it's better to eat the ground turmeric than to take the extracted curcumin. Turmeric is considered safe when used as a spice in foods, but more research is needed to establish the safety of turmeric when used in herbal remedies.

It's been said that if you take a round tablespoon of turmeric a day that should be enough to do the trick. But before going to the store there are a few precautions you should be aware of.

It should be used with caution by people with gallstones, stomach ulcers, or bile duct obstruction as turmeric may exacerbate these conditions.

Turmeric can be a uterine stimulant, so pregnant women should consult with a doctor before taking turmeric during pregnancy.

People with serious liver or heart conditions should also consult with a doctor before taking turmeric supplements.

However, unless taken in higher doses you shouldn't have a problem but, it's always a good idea to consult with your physician.

Recipe:

After eating the Cranberry Couscous numerous times I decided to try and get the recipe. Low and behold I did and I thought I'd share this tasty side dish with you.


Cranberry Couscous
serves 4-6 people

Ingredients:


Salad:
2 cups Israeli couscous, uncooked
1 cup dried cranberries
1 cup toasted pecans, quartered
2 scallions, minced

Dressing:
3 tbsp canola oil
1 1/2 tbsp champagne vinegar
1 orange, zest
1/2 orange, juiced
1/2 tsp. honey
1/2 tsp turmeric
1/2 tsp dried thyme
1/2 tsp dried tarragon
Salt and pepper to taste

Directions:


Bring a pot of salted water to a boil, and add the couscous. When it's done (roughly 8-10 mins, or when it's al dente), drain it but do not rinse. Set aside and let cool while you mince the scallions, toast and chop the pecans, and make the dressing.

In a small bowl, whisk together the canola oil, vinegar, honey, orange zest and juice, spices and salt and pepper.

In a large bowl, combine the couscous, cranberries, pecans and scallions. Pour the well-whisked dressing over it and toss to combine.

Serve immediately, or chill in the fridge for a few hours to blend the flavors.

Enjoy!

Tuesday, August 17

Peach and Blueberry Crostata

Today is my sons 24th birthday but he's not in town where we can all celebrate together. So in honor of his birthday I decided I'd bake something.

I love all kinds of fruit but peaches have always been one of my favorites. In fact if you can't hear me while I'm eating a peach then it must not be good. My husband can't stand to be around me when I'm eating one. I can't help it but I refuse to let any of the juice escape my mouth and because of that I tend to sometimes slurp the juice which I suppose is a bit noisy and annoying. So I tend to avoid eating peaches in the company of others. I know that sounds ridiculous but it's true.

When I found myself with more peaches than I could eat, and wanting to celebrate my sons birthday today I decided to make a Crostata. With peaches and blueberries on hand plus some ready made pie crust I figured I'd give it a shot.

The ingredients and prep for this rustic freeform tart are so simple. In fact it's the perfect dessert to whip together if you suddenly find out guests are coming over.


Ingredients:

Homemade pie crust or ready-made
3 cups fresh peaches, 1/4 inch sliced, peeled if desired and core removed
1/2 cup fresh blueberries
5 tablespoons sugar

Topping:
water
1 tablespoon sugar


Directions:

Slice fruit and place in a bowl with the berries. Add 5 tablespoons sugar and toss gently to coat fruit. Set aside while prepping the dough.


Place parchment on countertop and roll out dough to approximately a 12 inch circle.


Place fruit mixture in the center of the dough and carefully pull up the sides over the edges of the fruit. Leave an opening in the middle. Be careful not to tear the sides of the dough or fruit juices will ooze out during cooking.

With a pastry brush, brush the top of the dough with water and then sprinkle with 1 tablespoon of sugar.

Bake at 400 degrees for 50 minutes.


Remove from oven and let cool at least 10 minutes before removing from parchment. Allow Crostata to get to room temperature or still slightly warm before serving. Serve alone, with ice cream or whipped cream topping.


Enjoy!

Tuesday, August 10

Stir Fry Chicken with Vegetables


We're back home after vacationing in the mountains for a good part of the summer. For some reason I feel like I ate so much junk food out there that all I can think of is eating lots of fruits and vegetables. Of course, since I'm cooking for more than just myself my family likes to have either chicken or beef while I'm almost always craving fish, veggies and fruit. So to satisfy everyone I decided to make Stir-Fry Chicken with Vegetables.

If you've never tried to stir-fry it's so simple. The most important thing to remember is to mise en place all your ingredients. What that means is to get all the ingredients together, cut up and ready to toss into the wok.

Since stir-frying is very quick it's of the utmost importance to have everything on hand and ready to go. To stir-fry is to cook at very high heat. Once all your ingredients are prepped it takes all of 6-8 minutes to prepare a dish.

Here's the list of ingredients I used to make my dish along with the recipe. However, feel free to substitute for any other vegetables that you prefer.

Stir Fry Chicken with Vegetables
(serves 4)

4 boneless, skinless chicken breast halves, cut into strips
1 tablespoon Mirin (found in Asian section)
1 tablespoon oyster sauce
1 tablespoon dark sesame oil
8 oz. pkg of baby bella mushrooms, cleaned and sliced
1 1/2 cups sliced baby carrots, lengthwise
1 head of brocolli cut into bite size pieces
3 scallions, sliced at 1/2 inch angle
3 gloves garlic, minced
1/4 cup canola oil (or other high heat oil)
1/4 cup water

Sauce

1/4 cup chicken stock
1/4 cup Mirin
2 tablespoon oyster sauce
1 tablespoon dark sesame oil
1 tablespoon cornstarch
1 teaspoon sugar
1/4 teaspoon freshly ground pepper

Prep ingredients and set aside.

Prep sauce and set aside.

Place wok over the highest heat. When the wok is very hot, add 1/2 of the canola oil and roll around to coat the inside of the wok. When the oil starts to smoke add the chicken. Stir and toss the chicken until it loses its raw exterior color, about 1-2 minutes. Transfer the chicken to a plate and set aside.

Immediately return the wok to the highest heat. Add the remaining cooking oil and the garlic. Stir-fry the garlic about 5 seconds, then add the vegetables. Stir and toss the vegetables, adding the water to moisten. Stir-fry the veggies until they become bright in color, about 2 minutes.

Stir in the prepared sauce, then return the chicken to the wok. Stir and toss until all the ingredients are glazed with the sauce. Transfer to a platter and serve over mixed greens for a lighter dish, brown or white rice or polenta.

This dish is so delcious you'll want to lick the platter.

Enjoy!

Monday, August 9

Fascinating Chef Jose Andres

Last night I was watching 60 Minutes and was intrigued by the story of Chef Jose Andres.


If you missed this story please click on the video below to take a savory tour of his culinary laboratory, featuring his avant-garde cooking technique and molecular gastronomy. It's amazing!


I'm looking forward to the day that I can eat in one of his restaurants.


I'd love to hear your thoughts after you view this video.


Read more: http://www.cbsnews.com/video/watch/?id=6754666n&tag=contentMain;cbsCarousel#ixzz0w7Cj87pC

Thursday, August 5

Eggs - Fresh or Not?


I love eggs but don't eat them often. In fact if I eat eggs these days they're usually egg whites. I do however use them when baking as in the Birthday Cake recipe below.

Since the carton of eggs that I purchase may sit in my refrigerator for a while I never really know if they're still good. So if you're like me you might find yourself asking the question, "Are my eggs still good?"


Food poisoning is one of the worst experiences a person can go through, and it can even be lethal. Eggs can be the source of some delicious meals or desserts, but they can also be the source of food poisoning if they are eaten when they've gone bad. How do you tell when an egg is fresh or if it has gone bad, without cracking it open to find out? Here's a simple method that anyone can do.

Place the egg into a bowl of cold water. The water level should be deeper than the egg.

Observe what the egg does.

Fresh eggs will sink to the bottom of the bowl and probably lie on their sides.
Slightly older eggs (about one week) will lie on the bottom but bob slightly.
If the egg balances on its smallest tip, with the large tip reaching for the top, it's probably close to three weeks old.
Eggs that float at the surface are bad and should not be consumed, as seen in the photo above.

So next time when in doubt follow these steps and you'll be sure to know how fresh your egg is.

Are you an egg lover? Here is a great Egg Slicerand fun Egg Timer

Tuesday, August 3

Happy 21st Birthday Cake!


August 1st my daughter turned 21 years old. It's hard to believe how quickly the years go by. It seemed like just yesterday that I gave birth to her in literally just 30 minutes. Although painful and without anytime for pain killers it was quick.

In celebration of her birthday we decided we'd go out for dinner and then come home for dessert and drinks. My daughter had decided on a chocolate layer cake and then we found another cake that sounded interesting. It was a Chocolate Peanut Butter Cake. Although this cake was more complicated we decided to try it.

The ingredients are by far the most fattening I've ever made and in my opinion a heart attack waiting to happen. But we decided to go ahead and splurge. Afterall, it's not everyday you turn 21 years old.

The cake turned out really pretty and looked delicious! In fact if you love Butterfingers then you'll love this cake because it's one HUGE Butterfinger. However, we all had different opinions on the taste and combination of flavors.

Three out of five of us who had the cake thought that the chocolate peanut butter filling was too much. In fact, instead of using 1/2 cup of the peanut butter I think that 1/4 cup would have been sufficient or left out altogether. I also thought that the filling alone would be great as a fondue served with pound cake prior to placing it into the refrigerator to set as it states in the recipe below. The other 2 tasters loved the filling and the cake.

The cream cheese icing everyone agree was delicious! In fact, a couple of tasters thought it would have even been great used as the filling as well as the icing.

The cake tasted just like a butterfinger and most of us thought that the 3 flavors together didn't go well but any 2 combinations would work.

Funny thing is, after we all tasted it and gave our opinions the cake got nibbled on day after day. Today, August 3rd, I looked in the refrigerator when I woke up this morning and there's a huge dent in this enormous cake. So even though the cake got mixed reviews, there's something that's addictive about it that keeps everyone going back for more.

Here's the recipe below. Try the entire recipe or use portions of it or add some of your own special touches. It took two days to make it but was very simple even with the lists of ingredients.

My sons birthday is on August 17th so we're going to try making the Chocolate Layer cake, the other cake alternative.


Chocolate Peanut Butter Cake
(serves 12-15)

Filling:

2 1/4 cups heavy cream 12 oz. semi-sweet chocolate chips
1/2 cup brown sugar 1/2 cup natural peanut butter

Batter:

2 3/4 cups flour 1/2 cup natural peanut butter
2 teaspoons baking powder 2 cups brown sugar
1 teaspoon baking soda 4 eggs
1/2 teaspoon salt 1 teaspoon vanilla extract
10 Tbsp. unsalted butter, softened 1 cup buttermilk

Frosting:

12 ounces low-fat cream cheese, softened 3/4 cup heavy cream
1 1/4 cups powdered sugar 3/4 cup powdered sugar
6 Tbsp. unsalted butter, softened 2 Butterfingers, coarsely chopped
1 teaspoon vanilla extract

In a saucepan, bring cream and brown sugar to a simmer, stirring to dissolve sugar. Remove from heat and add chocolate chips. Let stand for a minute before whisking until smooth. Whisk in peanut butter. Chill filling, uncovered, overnight.

Preheat oven to 375 degrees. For batter, sift together flour, baking powder, baking soda, and salt In a separate bowl, beat butter and peanut butter. Beat in brown sugar and eggs, one at a time. Add vanilla. Beat in dry ingredients in 4 additions, alternating with buttermilk. Divide batter among (3) three 8 1/2-inch round cake pans coated with non-stick spray. Bake for 20-25 minutes or until a toothpick inserted comes out clean. Cool cakes for about 5 minutes before removing from pans.

For frosting, beat cream cheese, 1 1/4 cups powdered sugar, butter, and vanilla. In another bowl whisk cream and 3/4 cup powdered sugar to firm peaks. Fold in cream cheese mixture. Chill 1 hour or until firm but spreadable.

To assmble, divide filling among and spread over two cake layers. Stack layers, placing thrid layer, bottom side up, on top. Spread frosting over top and sides of cake. Sprinkle and press chopped Butterfingers over top and sides of cake.

Enjoy!